Tuesday, September 8, 2015

To tile or not to tile...

So I'm a day late... sorry, but lets call Labor day a blog holiday to.

I'm posting a project from the past but we still ask ourselves the same question,

To tile or not to tile...

Josh and I found this tray at some garage sale, it had a broken side but with a simple piece of leftover scrap trim it was as good as new.  We hung on to this for a while not sure exactly what to do but we finally settled on trying to tile it.

After breaking up some free tile found at the local Habitat Re-Store, we liquid nailed the pieces to the bottom.  I know using liquid nail to stick the tile down isn't the correct way to tile, it was the simplest way for us to do it.  After waiting a day to let the liquid nail dry, (not including the extra day that we had to wait because I missed a single piece of tile)  Josh grouted around the tile to create an even surface.

This is the final product after it dried.


It now resides in his mom's room as art instead of a plain tray.  Leave a comment below if you have any questions or tips for our next tile project.


Monday, August 31, 2015

Welcome sign

The first thing most DIYers want to make is a welcome sign.  Josh and I waited until inspiration struck us.


 We found some old metal desk parts on a scrap run and had some pallet wood laying around... 

Of course the first thing I think of is a welcome sign, so we lined up pallet wood underneath the desk support so that we could get the right shape to fit the arch of the support.  

Then Josh got to cut it out and attach it to the frame and then stain the wood.


Then I got to add the word "Welcome" to the sign using letter templates that I printed off the web and traced onto the sign.


Monday, August 24, 2015

Oinker for the yard

If you are anything like Josh, you tend end up with a lot of scrap leftovers from things you disassemble when they brake and it is not worth it to spend money to fix it.

And, if you are anything like me, you see animals and statues in all of those random spare parts.

This little oinker is a combination of both of us. He is made of a coil spring, rebar, metal ears, scrap from an aluminum cutter, washers, and other random parts I don't know what they are.


This little piggy got a black primer coat of paint to give him more protection from the elements.  Then he got a nice coat of pink spray paint and a blow dry from the fan.
Below is a picture of him in his new habitat, plus a new accessory in his nose (a hoop earing that lost it's mate)

Monday, August 17, 2015

Glass block lamp

I have been seeing glass blocks alot on pinterest these days and I thought 
"Hey that looks simple enough, just drill a hole and shove lights in side, no problem"

And it was simple until we tried to drill a hole into a glass block.
We tried a masonry drill bit... no luck
Went to the Menards and bought a glass drill bit... no problem right... wrong!
The glass bit gets hot so we have to get a watering can and slowly pour the water while we drill the hole.
Even the water doesn't help everything, we even used cutting oil to help the bit cut better.
Finally, we got a hole large enough to fit lights into.

Next step, shove the string of lights inside.
Which was easy until the lights didn't go where I wanted them to go, so we used a screw driver to try and gingerly move the lights to where I wanted them.  It sort of worked but eventually I got the lights to where I could work on the outside of the block.

The final step is to paint on the outside.  I chose to paint flowers in one corner to cover up where I didn't get a lot of lights and add a welcome to the top to make it friendly. (that is if a glass block can even be friendly)

Here's the finished product with and without the painting on the outside.


Give these glass blocks a try if you have the patience.


Monday, August 10, 2015

Wishing Well


Josh and I decided we needed to do something large again so why not a wishing well right?

This project was inspired by a similar wishing well that I saw online but like always we didn't have any plans, so we make it up as we go along.  We used 4x4 posts in the corners of the base with 2x4's along the top and bottom to make a sturdy box that wouldn't tip over with the upper weight of the roof. and covered the box with planed pallet wood.

For the roof we used more 2x4's for the t-shape on the sides and pallet wood on the cross pieces that support the leftover shingles from our new roof.  

Then you add the rod in the middle to make it look like more wishing well than just a weird box with a tall roof.  Although this picture doesn't have a bucket we did eventually add one which makes it even better.

We have made another wishing well since this one and I like it just as much. 
Hope you enjoy!

Tuesday, August 4, 2015

Meet Tippy the turtle.

Hello everyone,


 Tippy is made of a water pump (this lovely green thing to the left), a couple soup cans and a whole lot of metal nuts in various sizes and just as much hot glue.


Just add a little paint and personality to the shell and you have my new favorite critter Tippy who I don't have to feed or pick up after.


Meet Tippy!

Tuesday, August 19, 2014

Scrap ladders

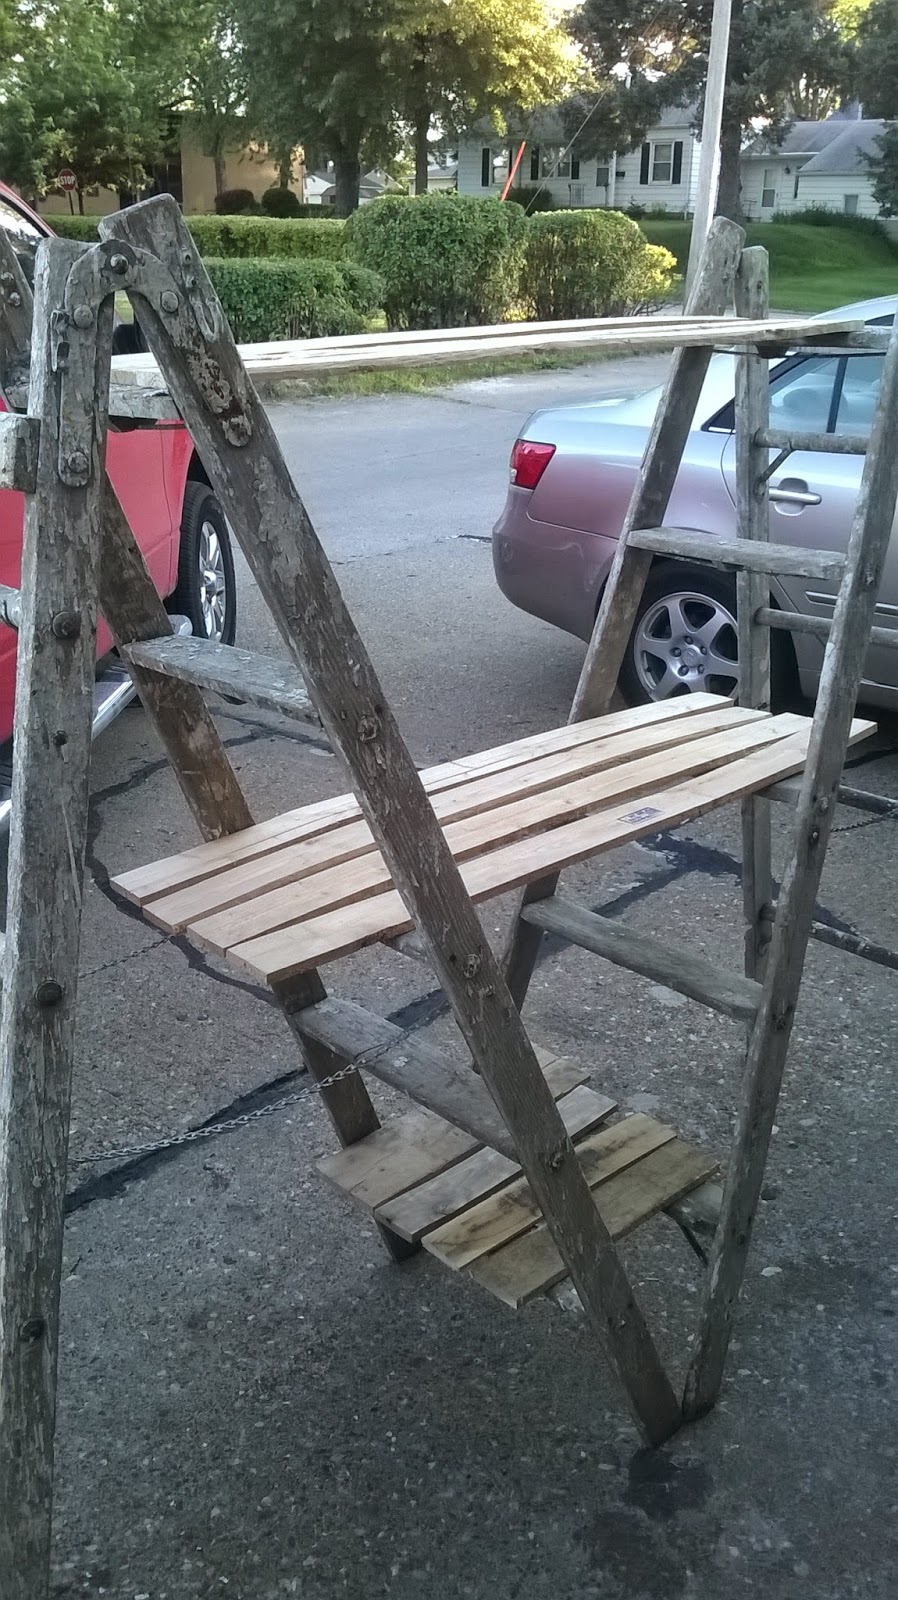
     As much as I hate when scrappers come take my "garbage/ future project" from near my garage, I don't mind if they take it when it is clearly by the garbage can next to the curb.  That being said I found these 4 wonderfully paint splattered ladders, 3 medium size scaffolding, and a large scaffolding on a scrap search the other day.  


My idea originally was to use some of the pallet wood and scrap lumber to make a plant stand.  But when I got everything home I noticed that the scaffolding fit nicely onto the ladders and extended the amount of space I had to put flowers.  I got really lucky because the scaffolding just fit between the existing structure in the back yard.  By just fit I mean the bottom would ONLY go in strait not diagonally. (ie. scooting the ladders out to put the board on and then scoot it back in between the vertical boards.)


 We used old tins as planters to keep with the rustic look.

As a small bonus project I used one of the ladders to hold up a plant that is forever falling down under it's own weight in the summer.  We call this plant the Flamingo Plant because it has pretty pink flowers that look like flamingo heads before they pop. Don't let the pretty flowers fool you though because the stems are full of thorns.


Saturday, August 16, 2014

Time to have some light fun.

According to Josh every kid should make a lamp in school using a stuffed animal.  Sadly, I missed out on this activity. It's probably because I stayed out of the shop classes and away from sharp objects.  So to rectify this lapse in lamp making we set out to make a lamp using an stuffed Eeyore (I'm not saying who had it).  This was not one of our more economical projects because we had to buy all the lamp parts to make it work.  Each one cost at least $15, which isn't a lot in the long run, but if you compare it to most of our other projects which were basically free it does seem like a lot.

Here's Eeyore
 And because Eeyore was so darn cute we just had to make his friends.  We found Pooh and Tigger at the local Goodwill for a dollar.


The hardest friend to find was surprisingly his little buddy Piglet.  It took us a couple of weeks but we eventually spotted him at store for a couple dollars.

Now all the friends are together again.  They had such a good time they decided to take their shades off and throw a party.

 Not really, I just for got to take a picture with all the shades on them. So this while they were still in the garage waiting for us to find a shade or four.


Friday, August 15, 2014

Let's Plant

Like I may have said in the past, I don't have a green thumb, but that doesn't stop me from wanting to plant plants (man, that sound's weird) around the house.  Today Josh and I decided he needed planter boxes to plant tomatoes in.  So here we go with our scrap pallet wood.

First, I laid out the wood for all of the sides to make sure they would fit correctly.  This sounds really simple but if your pallets were anything like ours, the boards came in different widths and not all necessarily strait either. I decided not to worry about making the top of the planter even, opting for the rustic look.
Next, we laid out some of the short broken wood from out pallets to keep the wood together, and nailed them into place with our trusty nail gun.

The third step was standing up the sides and nailing them to the base.
Here is the final product, minus the dark stain we put on it.  We made another one because it was fairly simple so now Josh has two tomato plants growing outside his house.


Thursday, August 14, 2014

Candy Machines!

Who doesn't love a little candy now and then?  Well Josh and I definitely do, so we decided that we needed to recreate the wooden candy machine that he made when he was younger.  Unfortunately, we couldn't find the original so we used THIS ONE from Instructables to make ours. 

All you will need is some small pieces of wood and an empty jar with it's lid to make this quick project.

It was so simple we made another one a couple of weeks later without the directions.  Plus, we decided it wasn't cute enough as it was, so I painted a couple of m&m's on it too!


 Check back later to see another candy machine we are making using an old flower pot.

Monday, June 9, 2014

Little Tool Box

Another project made from leftover pallet wood.  You couldn't even tell could you?
That's the amazing thing about pallet wood, just a little sanding and some stain and it looks like store bought wood.
 
 
Josh made this cute little tool box with some pallet wood and a believe it or not an old handle from a broken car jack handle we found on the side of the road.
It seemed a little small for tools but it was a perfect fit for the small amount of paints that I use for all of our projects.
 
Thanks for the new paint holder Josh!

Saturday, June 7, 2014

Pallet Trunk

I've recently been obsessed with all of the pallet projects I've seen on Pinterest. So I convinced Josh to get some leftover pallets from work so that I could sooth my obsession.  So this is what I decided to make.

Since this didn't come with directions I figured Josh and I could make it work our own way.

 The first thing I need to tell you about working with pallets is that taking them apart is the toughest part of the whole process.  For us the best way to take apart the pallets and still get some larger pieces of wood was to take a circular saw and cut as close to the supports as possible.  Doing this we ended up with boards about 17 inches long.

For my trunk I decided to use the support pieces (the ones with the notches cut out) as the front and back of the trunk instead of on the sides like the inspiration picture.  The trick with this project was to get the right boards to line up and get to the correct width of the trunk.  This was a little tricky because each of the boards was a different width and we had to swap out boards to make it the right fit.

Add some dark walnut stain....
 

And taa daa  a complete trunk that is perfect for all of my shoes. (with bonus built in vent holes)


Thursday, June 5, 2014

Plants I don't have to water!

The first thing to know about me is that I suck at keeping plants alive.  So if you combine that with Josh's welding skills this next project was perfect for us.  Metal Flowers!
This is a metal flower that we found in a local store and we figured we could do this.  It's made up of an old saw blade, a metal rod/rebar, and a spring for the leaves.

Here are our flowers.


We got some old saw blades from the local Habitat ReStore for $1 and used some of Josh's leftover metal from his scrap bin including the rebar for the stems.  After Josh got the flowers all welded together he put a base coat of spray paint on the whole flower and stem.  Then I come in with my craft paint and add the detail lines.

Aren't they cute!


Thursday, May 15, 2014

Bookmark Birdhouse


So to start off my crafting saga I found this cute birdhouse on from Curbly on Pinterest (where you can find all sorts of awesome projects) and thought Josh and I can so do this.

created at: 02/24/2011

Of course, being me I didn't exactly read the instructions for this project because how hard could building a birdhouse really be right?  So off to the hardware store we go to pick up a piece of wood to build it.  Ours was 7 1/2" wide and 5' long.

Problem 1: Josh doesn't have any books at his house so we had to guess on the size.  So I guessed 11" should be just fine with a center support.

Problem 2: We had trouble making our peaks the same size/angle.  Personally I'm blaming the saw blade and the combination square (the triangle tool with a double edge on a strait edge used for marking right or 45 degree angles) for being a little off.  So to fix this we just traced the first one we made onto the leftover wood so that they matched up.

So after we got all of our pieces cut
 3 peaks that ended up being 7 1/2" wide and about 11" tall
 2 sides that were 11" wide and 7 1/2" tall

Time to Assemble
We (I should say Josh) nailed two of the peaks to each side (so that the sides were between each peak) to make a normal bird house.

Then we slid the third peak into the middle (we had to shim in some spots to make it tight... I'm still not sure how that happened but that's how woodworking goes).  When it was in place we nailed in from the side of the birdhouse.

After we had it all together Josh drilled a large and small hole into the front peak to make it look like a regular birdhouse.  We put a bolt in the smaller hole after I painted it to make the a place for the "bird" to sit. 

To paint it I decided to use up some of the leftover paint I have laying around my house and put purple and yellow stripes on it.

Here's our finished project (without the roof/book)


P.S. I went back later to actually read the directions from Curbly and he used a lot of fancy tools to make his that we just wouldn't have had access to so in the end I love my oversized bookmark birdhouse.

It's Time to Get Crafting Again

Hello out there in cyberland!
    Did you miss me?  If not that's ok because I'm back and even more crafty and DIY-ie (I know that's not a word but I don't care) than ever.  I have recently graduated from college with my degree in Interior Design but like most of the world I haven't found a job in my chosen field yet.  That being said I get to enjoy working in the library with TONS of books about crafts, design, architecture, painting.... the list goes on and on. 
  
      Anyway, needless to say, I don't get to expend all of my creative juices at work so I have started building projects with my boyfriend Josh (who is awfully handy in the garage).  This has been a great way to keep us occupied outside instead of in front of the TV like we used to be.  So this is the way I'm going to share my awesome projects with the rest of you crafters out there.

     My plan is to take this blog and turn it into a designers craft showcase with the bonus of actually being able to make all of these crafts without loosing my mind. So with that in mind, I'm going to show you what my inspiration was for each project and then show you how in the world I did it.

Enjoy the knew Eye of the Potatoe blog.

Wednesday, December 5, 2012

Sink into your sink

Today I want to introduce you to some of the more interesting sinks I have found.  These are not your standard vessel, under mount, or self rimming sinks.  The ones below have a personality all their own.

This Shell Sink is by High Tech and was designed based on a shell print that the company found on the beach next to their building.   This is such a great way to add a little bit of interest to a guest bath.  I also think it would be fun in a kids bathroom because they would likely love to watch the water spiral down the sink.


This Sink by Lago looks like the sink is literally peeled up off the wall.  This would absolutely make a statement and cause guests to take a second look to make sure they weren't imagining it.  This sink is best suited in a contemporary bathroom where it can take center stage and shine.

Curved Mosaic Tile Bathroom Sink by Lago

This modern sink is showcased on Interior Complex.  This expands the shell idea from the top and travels down the entire wall to the drain in the floor.  Personally, I don't think I could handle the idea that my sink was going to drip on the floor on purpose.  That being said I DO love it for someone who is bold and brave. The bright white of this sink is a perfect balance to the fire engine red subway tiles.


This sink is designed by Philip Watts.  This pedestal sink has gone on an extreme diet and I love that about it. The very sleek base opens gracefully into the large sink area that refuses to let the user mar its elegance in any way.  This means that you would have to store your toothbrush and soap somewhere else because there is no counter on this one.


This  Ebb Bathroom design has many different layouts but I loved how in this set  up the sink and tub mirrored each other.  My favorite part however was the clear fronts that made the sink cooler and the tub a little more risky.


Here is another layout from the Ebb Bathroom.
ebb sink bath shower Ultra Modern Design   Ebb Bathroom